
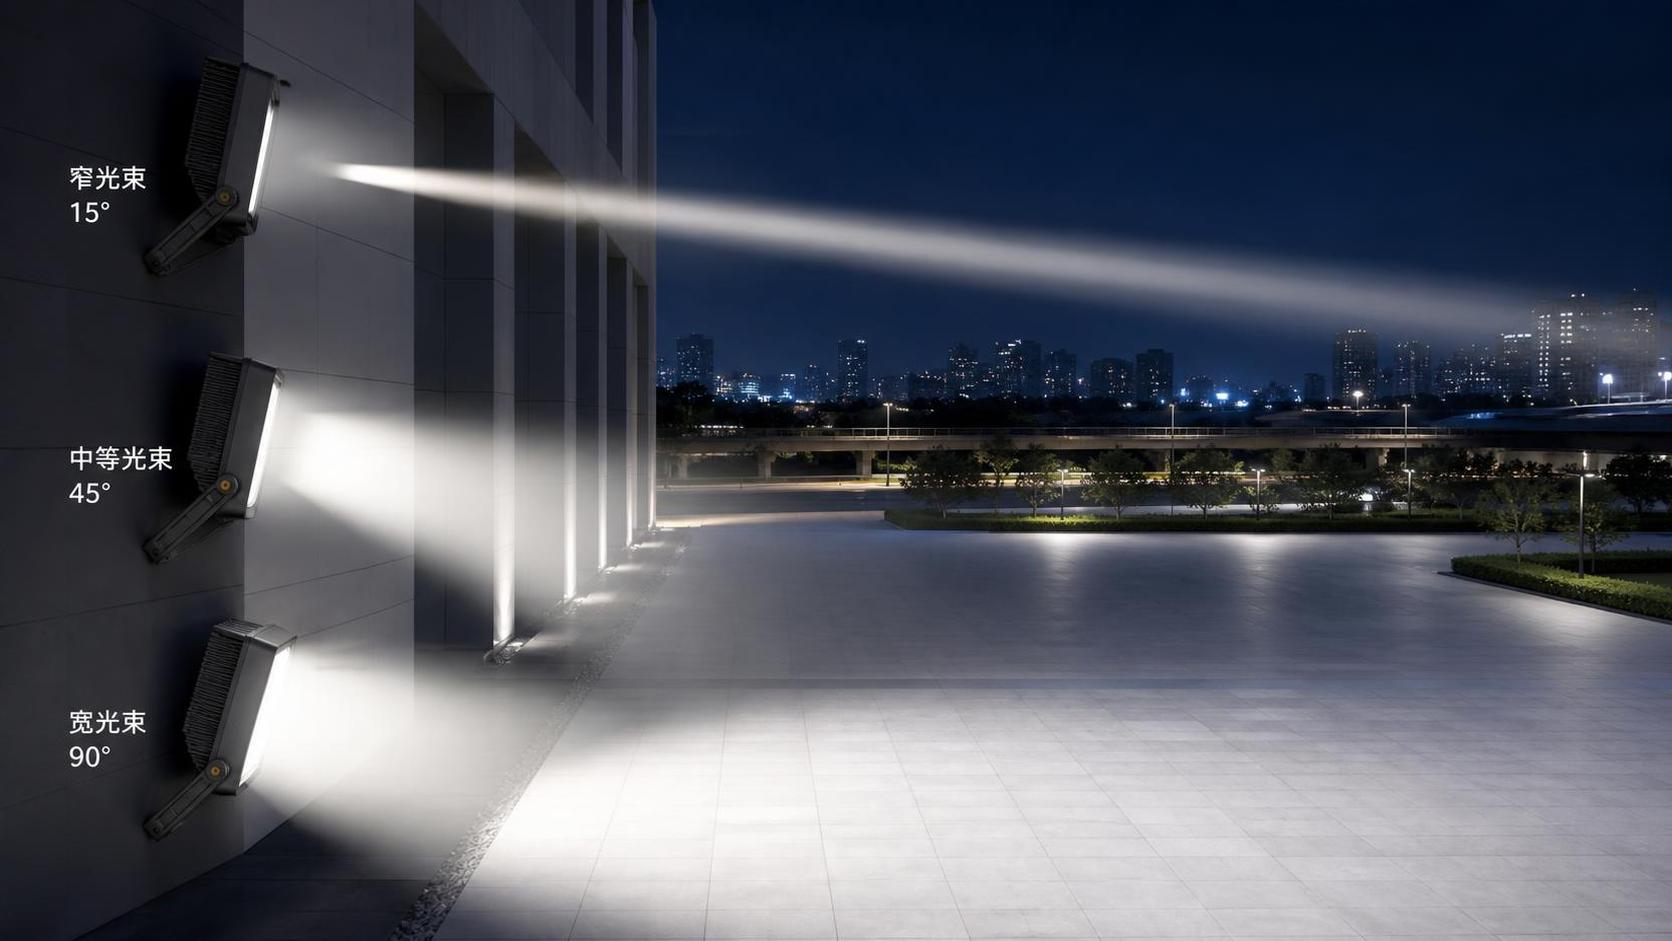
What Beam Angle Works Best for a High Power LED Floodlight Installation
Choosing a beam angle for a high power LED floodlight sounds simple until the installation is on site and the lighting does not behave the way the layout suggested. A beam that is too narrow can leave dark gaps between fixtures, while a beam that is too wide can spill light into unwanted areas, reduce useful illuminance, and create uneven visual results.
This is a common issue in outdoor lighting projects because beam angle is tied to more than brightness. It affects pole spacing, aiming, glare control, energy use, and maintenance expectations. If you are reviewing specifications for roads, facades, yards, or public spaces, the better question is not which angle is strongest, but which angle matches the task, mounting height, and distribution pattern you actually need.
Why beam angle selection becomes a problem so often
Many teams start with wattage, lumen output, or IP rating and leave beam angle for later. That usually creates trouble because the optical distribution is what decides where the light lands. Two fixtures with similar power can perform very differently if one has a narrow beam and the other has a wide beam.
In a high power LED floodlight installation, the wrong beam angle can lead to several practical issues. One is patchy coverage, especially in wide outdoor areas where fixtures are mounted high and spaced far apart. Another is glare, which becomes more obvious when a narrow beam is aimed directly into a viewing direction. A third issue is wasted output. If light spreads beyond the target area, the project may still look bright from a distance but fail where it matters most: on the pavement, wall, work zone, or open public area that needed controlled illumination.
That is why beam angle should be treated as a planning decision, not just a product detail. It needs to be considered together with fixture mounting height, target area dimensions, surrounding obstructions, and the level of uniformity expected in the finished installation.
The first step is to match the high power LED floodlight to the actual lighting task
Beam angle works best when it is chosen around the application rather than around a generic preference for narrow or wide optics. In practice, outdoor projects usually fall into a few common patterns.
For long throw lighting, a narrower beam is often more suitable. This includes cases where the fixture must project light over distance, such as tall mast installations, facade highlighting from a setback position, or perimeter zones where fixtures are mounted away from the target. A narrower beam keeps the light concentrated and helps preserve intensity at the point of use.
For broad area lighting, a medium or wide beam is usually easier to manage. Open plazas, loading areas, campus spaces, and general-purpose yards often benefit from wider coverage because the goal is not to emphasize one point, but to create usable, even light across a larger field.
For mixed environments, there is rarely one perfect angle for every fixture. Some projects require a combination: narrower beams on the perimeter, wider beams in central areas, or different aiming strategies based on pole location. This is where many specification mistakes happen. Teams sometimes try to force one optic to solve all positions, and that usually leads to compromise in both coverage and control.
Common beam angle ranges and where they usually fit
Although exact definitions vary by product line, it helps to think in working categories rather than fixed numbers.
Narrow beam angles are generally chosen when the target is far away, relatively compact, or needs emphasis. These angles can improve reach and intensity, but they require more careful aiming. They are less forgiving if fixture positions are not consistent.
Medium beam angles are often the most flexible option for a high power LED floodlight. They can balance reach and spread, making them useful in many outdoor installations where the area is not extremely large and the fixture height is moderate.
Wide beam angles are typically used when coverage matters more than punch. They are helpful for open areas with shorter throw distances, but if they are applied too high or too close to property boundaries, spill light and reduced uniformity can become a problem.
The important point is that beam angle does not work alone. The same beam behaves differently at different mounting heights. A wide beam from a low position may work well, while that same beam from a tall pole may become too diffuse. Likewise, a narrow beam on a low mounting point may create harsh hotspots that look impressive in isolation but fail in practical use.
How to make the decision without guessing
If you are comparing options, it helps to move through a short checklist before selecting the optic.
- Define the target surface clearly. Are you lighting a roadway edge, building face, pedestrian zone, storage yard, or security perimeter? Beam angle decisions become vague when the target area is not defined in shape and size.
- Check mounting height and setback distance. A fixture mounted high and far away usually needs a different distribution from one mounted lower and closer to the target.
- Review spacing between fixtures. If poles or brackets are widely spaced, a very narrow beam may leave visible gaps. If fixtures are closely spaced, a very wide beam may create too much overlap and waste output.
- Consider glare and adjacent areas. Near roads, public walkways, or property boundaries, beam control matters as much as brightness. A wider angle is not automatically better if it increases stray light.
- Look at maintenance and aiming tolerance. Narrower beams usually demand more precise installation. If site conditions make precise aiming difficult, a slightly broader beam may produce more reliable results over time.
This kind of process is more useful than asking for a universal “best” beam angle, because there is no single answer that works across all outdoor conditions.
Where specification teams often make the wrong call
One common mistake is assuming that higher power means wider coverage. In reality, power affects output, but beam angle controls distribution. A high-output fixture with the wrong optic can still perform poorly.
Another mistake is choosing the narrowest beam available to maximize brightness. That can be useful in accent or long-throw conditions, but in general area lighting it often creates bright centers and weak edges. The result may look strong in a product sheet and disappointing on the ground.
A third mistake is ignoring the wider system context. In many outdoor projects, floodlighting is only one part of the site. Road lighting, pedestrian circulation, smart controls, and environmental durability all influence the final decision. For example, in projects that combine area lighting with connected infrastructure, planners may also review integrated systems such as Smart Street Lighting | SSL-CH when they need coordinated pole-based layouts, remote control capability, and reliable outdoor performance. That does not replace proper floodlight selection, but it shows why optics should be considered as part of the full installation logic rather than as an isolated fixture choice.
A practical way to compare narrow, medium, and wide options
If you are unsure which direction to take, start with the application goal and test the tradeoff you are least willing to accept.
If dark gaps are the biggest risk, begin by checking whether a medium or wide beam improves overlap without causing spill. If glare or long throw is the bigger concern, review a narrower distribution first. If both issues matter, the answer may be a mixed layout instead of a single beam angle across the whole site.
For projects with demanding outdoor conditions, it is also worth checking whether the supporting hardware and platform are suited to long service cycles. In broader smart-city or contractor-led deployments, products with outdoor-ready characteristics such as IP67 protection, operation in low and high temperatures, and remote control compatibility can support more stable performance at the system level. Options in that category, including Smart Street Lighting | SSL-CH, are generally more relevant when the project involves coordinated poles, controls, and urban infrastructure rather than standalone floodlight placement.
Common Questions
Is a wider beam angle always better for outdoor coverage?
No. A wider beam can cover more area, but it can also reduce effective intensity and increase spill light. It is useful when the target area is broad and relatively close to the fixture, but not when control and throw distance are the main priorities.
What beam angle is usually used for a high power LED floodlight on tall poles?
There is no single standard choice. Tall poles often need medium or narrower distributions depending on the target size, spacing, and required uniformity. The higher the mounting point, the more important it is to check how the beam opens over distance.
Can one beam angle work for an entire outdoor project?
Sometimes, but not always. Projects with mixed zones often benefit from different optics in different positions. Trying to solve every area with one angle can create compromises in both coverage and glare control.
Does beam angle matter as much as wattage?
Yes. Wattage affects output, but beam angle determines how that output is distributed. In many cases, distribution has a bigger effect on visible performance than power alone.
Final Takeaway
The best beam angle for a high power LED floodlight installation depends on where the fixture is mounted, how far the light needs to travel, how evenly the space must be lit, and how much spill or glare the site can tolerate. Narrow beams help with reach and focus, wide beams help with spread, and medium beams often provide a useful balance. The safest approach is to choose the optic based on the actual task, not on assumptions about brightness alone.
For contractors, engineers, and project owners working on outdoor lighting, that decision is easier when optics, mounting layout, and broader infrastructure planning are reviewed together. That is usually what separates a layout that only looks acceptable on paper from one that performs reliably in the field.